Here’s how I added wireless charging to my 2018 Honda Odyssey EX (with photos).
First, the top of the center console trim with the cup holders came off. (Also, the rubber pad that goes over the black plastic piece on the top, where the stock wireless charger for the higher level models would have gone.) There’s lots of clips holding it on tightly, be sure to get a set of auto trim tools to get it off without scratching the plastic, they can be found for less than $10 at Amazon or Harbor Freight.

A closeup of the plastic underneath, after the black plastic piece mentioned above was removed.

A closeup of the black plastic piece under the rubber mat. In the higher level models (EX-L and above), this would either have a similar piece that would already hold the Honda wireless charger, or it would have this same piece with a connecting cable waiting in that slot for a dealer upgrade for the charger. The Honda wireless charger has a proprietary 7 pin connector, so at a minimum I would have needed to purchase a whole new center console wiring harness, and even then, there would be no guarantee that it would integrate with the touch screen controls. That seemed like an expensive path with a possible dead end and one not worth going down. Therefore, in my case, I modified this piece to hold a wireless charger I purchased on Amazon.

Another shot of the black plastic piece, along with the piece underneath.

Here’s the wireless charger I used. I selected this for two reasons: (1) it’s almost a perfect fit for the stock Odyssey rubber pad, and (2) it has five coils which allow the phone to be placed almost anywhere on the charger.

I removed the rubber feet on the bottom to access the screws to remove the top.

Here’s a view with the top off, showing the five charging pads.

I cut the black plastic in the shape of the wireless charger and epoxied the charger to the plastic. Not the best cutting and epoxy job, but good enough to get the job done.
Oh, and while I’m thinking about it, in case I need to replace them later, the part number for that piece I cut up is 83400-THR-A1 (panel non-wireless charge unit), and the part number for the rubber pad is 83405-THR-A1 (mat non-wireless charging unit).

I installed a panel mount USB charger in a seemingly odd spot, the reason will become clear in the next photo. I also added “kill” switches (inside the storage compartment) for the wireless charger and the middle row chargers which I had added previously.

The wireless charger is connected to the panel mount charger using a right angle USB-C to USB-A cable.

Wireless charger mounted, rubber pad on top, almost done!

And center console trim reinstalled, all finished!

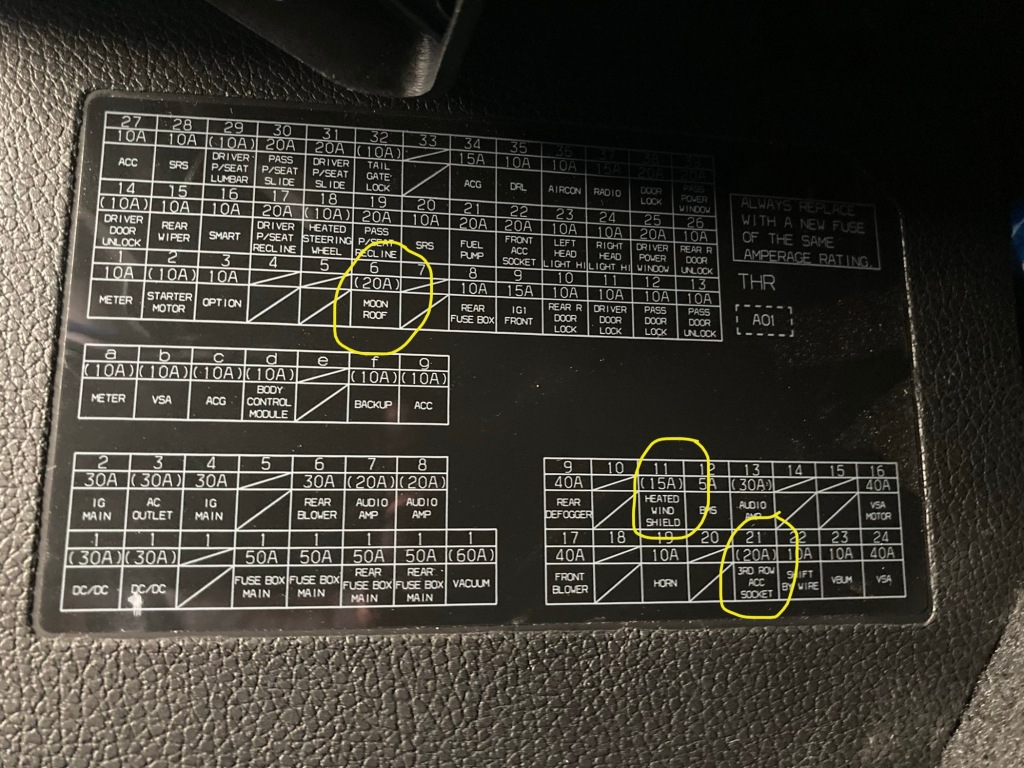
Here’s where I found power – three unused locations (at least in my model) in the front fuse box to use with my fuse taps.

Here’s the fuse taps in action. (I only needed one for this project, the other two are for other chargers.)

Since I was taking off the top of the center console anyway, I went back to my prior middle row USB installation and replaced one of the mounts with a new panel mount which supports USB-C PD and QC 3.0, The Powerwerx and cigarette lighter mounts were there from the prior installation.

Also, when the console cover was off, I took the opportunity to put in screws to hold the plastic plate with the middle row USB ports, which would previously pop out on occasion.
